http 请求
Axios
框架中封装了 axios,已经全局挂载到 globalProperties 中,下面是举一些🌰
get 请求
点击查看
// 在vue文件中
import { getCurrentInstance } from 'vue'
import user from '@/config/api/user'

const { proxy } = getCurrentInstance()
try {
  const res = await proxy.$http.get(user.xxx, { params })
} catch (err) {
  console.log(err)
}

// 在js文件中
import axios from '@/config/http/http'
import user from '@/config/api/user'
try {
  const res = await axios
  .get(user.xxx, {
    params
  })
} catche(err) {
  console.log(err)
}
post 请求
点击查看
// 在vue文件中
import { getCurrentInstance } from 'vue'
import user from '@/config/api/user'

const { proxy } = getCurrentInstance()
try {
  const res = await proxy.$http.post(user.xxx, data)
} catch (err) {
  console.log(err)
}

// 在js文件中
import axios from '@/config/http/http'
import user from '@/config/api/user'
try {
  const res = await axios
  .post(user.xxx, data)
} catche(err) {
  console.log(err)
}
put 请求
点击查看
// 在vue文件中
import { getCurrentInstance } from 'vue'
import user from '@/config/api/user'

const { proxy } = getCurrentInstance()
try {
  const res = await proxy.$http.put(user.xxx, data)
} catch (err) {
  console.log(err)
}

// 在js文件中
import axios from '@/config/http/http'
import user from '@/config/api/user'
try {
  const res = await axios
  .put(user.xxx, data)
} catche(err) {
  console.log(err)
}
delete 请求
点击查看
// 在vue文件中
import { getCurrentInstance } from 'vue'
import user from '@/config/api/user'

const { proxy } = getCurrentInstance()
try {
  const res = await proxy.$http.delete(user.xxx, { params })
} catch (err) {
  console.log(err)
}

// 在js文件中
import axios from '@/config/http/http'
import user from '@/config/api/user'
try {
  const res = await axios
  .delete(user.xxx, {
    params
  })
} catche(err) {
  console.log(err)
}
如何与后端联调
vite 配置代理
注意
更改代理后必须重启项目
第一步:在 vite.config.js 中,举个🌰
proxy: {
  '/qsdi': {
    target: `http://192.168.1.121:8888`,
    changeOrigin: true
  },
}
第二步:在 src/config/api 目录中,创建一个 user.js 接口需要存在 /qsdi 来代理一个具体的请求路径,举个 🌰
export default {
  login: '/qsdi-auth-service/oauth/token', //登录接口
}
此时从 chrome 的 network 中看到的请求地址为
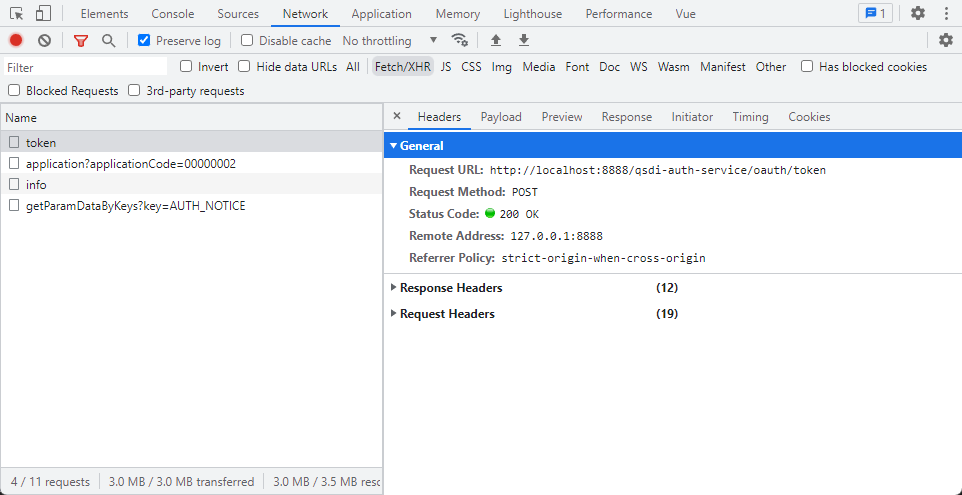
真实代理地址已经为 http://192.168.1.121:8888/qsdi-auth-service/oauth/token
多个后端地址代理
proxy: {
  '/qsdi-system-service': {
    target: `http://192.168.2.52:8881`,
    changeOrigin: true,
    rewrite: (path) => path.replace(/^\/qsdi-system-service/, ''),
  },
  '/qsdi': {
    target: `http://192.168.1.121:8888`,
    changeOrigin: true
  },
}
JWT Token (无感刷新)
实现原理:登录时后端会返回两个 token (一个用来请求,一个用来过期刷新)和过期时间,前端将其本地存储,每当接口请求时,把本地存储的过期时间与本地当前时间对比,如果 token 过期就把当前发送的请求暂存,然后去请求刷新 token 接口,获取到新 token后,再触发暂存的请求
如何实现:
在 src/config/http/http.js 中
第一步:声明一个 retryOriginalRequest 方法用来暂存失效的原始请求
第二步:当 token失效后 调用 retryOriginalRequest 使用 Promise 暂存此请求,不做响应
第三步:调用刷新 token 接口,当接口完成后循环调用暂存的请求